- 最新文章
-

-
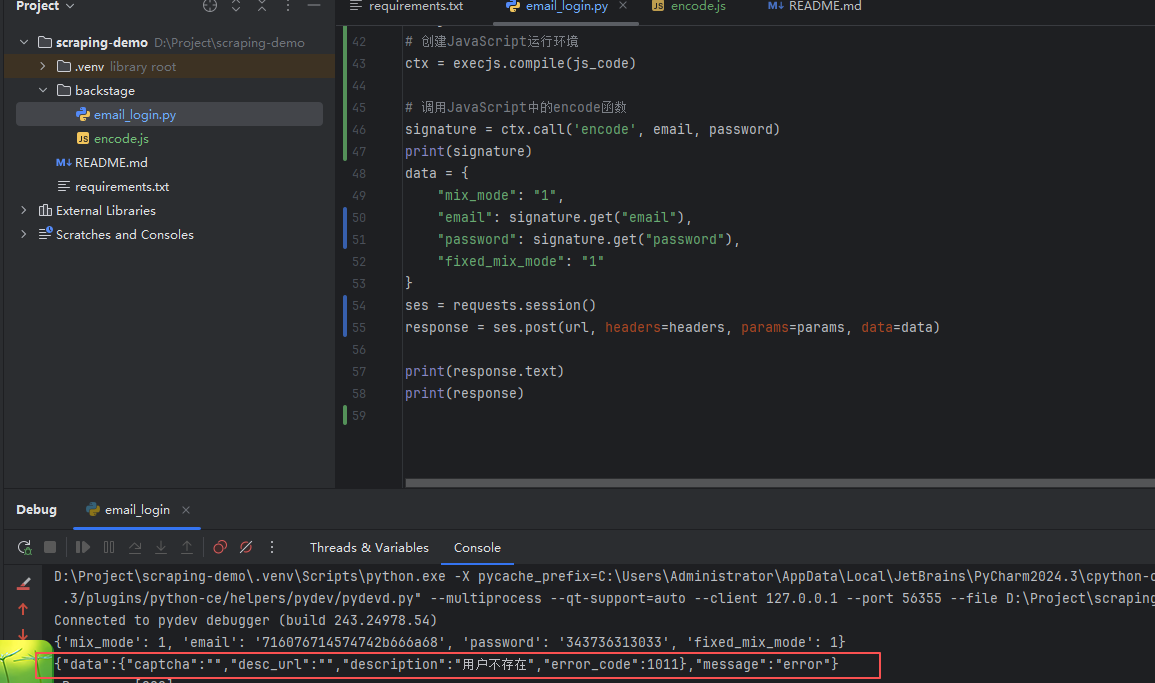
 Tiktok直播工会(backstage)登录接口逆向分析 一、获取接口信息 输入账号密码,用测试账号验证,返回【用户不存在】。获取到接口信息 二、提取Curl(Bash)并PY调试 curl 'https://live-backstage.tiktok.com/passport/web/email/login/?aid=6849&account_sdk ******' \ -H 'origin: https://live-backstage.tiktok.com' \ -H 'priority: u=1, i' \ -H 'referer: https://live-backstage.tiktok.com/login/' \ -H 'sec-ch-ua: "Not)A;Brand";v="8", "Chromium";v="138", "Google Chrome";v="138"' \ -H 'sec-ch-ua-mobile: ?0' \ -H 'sec-ch-ua-platform: "Windows"' \ -H 'sec-fetch-dest: empty' \ -H 'sec-fetch-mode: cors' \ -H 'sec-fetch-site: same-origin' \ -H 'user-agent: Mozilla/5.0 (Windows NT 10.0; Win64; x64) AppleWebKit/537.36 (KHTML, like Gecko) Chrome/138.0.0.0 Safari/537.36' \ -H 'x-tt-passport-csrf-token: a906a34a2173cd10c6545263c1e59f9a' \ --data-raw 'mix_mode=1&email=716076714574742b666a68&password=343736313033&fixed_mix_mode=1' https://spidertools.cn/#/curl2Request 转档工具 三、动态参数分析 https://live-backstage.tiktok.com/passport/web/email/login/? aid=6849 &account_sdk_source=web &sdk_version=2.1.1tiktok &language=zh &verifyFp=verify_mf2ei3yj_rW0kxKk1_FyCq_49si_By4P_ETLDQH53cH8W &msToken=JanwbbLdWRl7MwB7MlM2QnQyJ5XBYko1AYhqkzvcjbM7-42WPGE84UPKdI2JN5Nblg_TEZWYP1-bBY9dsR-EvzKTXGj-IBrI1O-8VPC8N-7cySYx2hhOkq2O9-NUoOmNklbY7Hs= &X-Bogus=DFSzswVLX2U-N8XFCjKW5tkX95u6 &X-Gnarly=MHhiz/15I-q/eyG1qJM0CsKVedPhe41lkx5xyU/L6uEpQIYercbqpwcJM5Yp78PlaXPeu8L5FFM6EAVnBNIn51IYnmZrheJY0RTTTwE6iqfDTYbnXLk/avp9k1sfqtl57xaUvvgXfE8Ic7491kvPTkHp82E06f6KAHLW5bm72/qUqvJ8mdjaxuBV3nj1FJUbahRZcw2q0Q/bgCbiCpYEVmNOb/SvP/RyS/HJbH10JNpfByJjQ0vNYdtLUhqdShztSINAw14zAZWS cookie: xxx 系统输入输出,只对 Payload FormData 中 【email、password】加密 四、加密算法定位 检索关键词 主要位置Debug断点 再次点击登录进入接口Axios 请求。并获取堆栈信息。获取关键参数及代码 从而获取关键代码位置: cb(x,y) a5() a5 可以看出来是对象的函数 Object.assign(target, ...sources) 执行的是浅拷贝 四、扣取代码 扣取代码获得和上面加密信息一致。 成功验证接口 ``
 -

-

-

-
 谈谈mysql和oracle的使用感受 -- 差异 之前一直使用mysql作为存储数据库,虽然中间偶尔使用sqlite作为本地数据库存储,hive作为简单查询工具,maxcompute作为大数据查询服务等等,但没有感觉多少差别。事实上,我们往往听说SQL-92标准之类的云云! 后来遇上了oracle,且以其作为主要存储,这下就不得不好好了解其东西了。oracle作为商业数据库里的佼佼者,肯定有其过人之处的。oracle与mysql同样是sql类数据库,大体上是差不多的,我是指crud大体流程。 但细节总是不一样的,尤其是有些老梗值得一提。本文从使用者的角度来说说感受,希望可以帮助大家快速了解其大致差异以提供一份简单避坑手册,并无其他意思哟。(理解上也并不深入) 1. 自增主键 mysql中要使用自增主键非常方便,只需要在建表时增加 auto_increment 关键字即可,样例如下: create table tb1 (id int(11) unsigned not null auto_increment); 而在oracle中则不一样了,它需要使用另一个概念:序列号;我们可以简单将其理解为只有一个列的表,这个表提供了 nextval 的方法,辅助我们生成自增id,样例如下: -- 1. 建普通表 create table tb1(id number not null); -- 2. 创建序列,参数比较多,自行查阅资料 create sequence seq_tb1 increment by 1 start with 1 minvalue 1 maxvalue 999999999 -- 3. 插入使用 insert into tb1 (id) values (seq_tb1.nextval) 可以看到,oracle的操作明显多了许多。当然了,自增这个属性,在许多数据库中确实也是不提供的,尤其是分布式数据库递增更难做。所以,要支持这功能,绕路也就在所难免了。 2. 创建索引 索引的目的自然是为了提高查询效率,mysql中想要添加索引可以在建表时操作,也可以在后期更改;样例如下: -- 1. 建表时指定 create table tb1 (username varchar(50), index username (username)); -- 2. 后期更改 alter table tb1 add index username (usrrname); 而在oracle中则不一样,它只能在建表完成之后操作;样例如下: CREATE INDEX tb1_username ON tb1(username); 看起来差异不大,但oracle的索引是全局的,即所有表的索引名都不能重复,比如大家都有id索引,但却不能都叫id。另外,oracle建表时,无法做到一步到位。实际上需要n步:建表sql + n个注释sql + 主键sql + n个索引sql + 建序列号sql + 。。。 总之,会让你醉了! 3. 字段表注释 我们建一张表时,肯定都需要注释的,否则过两天连我们自己都不认识其含义了。mysql中在建表或增加字段时直接指定,样例如下: -- 1. 建表时指定 create table tb1(username varchar(50) comment '用户名标识') comment '测试建表'; -- 2. 修改表结构时指定 alter table tb1 add column nickname varchar (100) '昵称'; 而oracle中则不太一样,它只能在建表之后和创建字段之后才能进行注释;样例如下: -- 表注释 comment on table tb1 is '测试建表'; -- 字段注释 comment on tb1.username is '用户名称标识'; -- 删除表注释,置空 -- 删除列注释,置空 我不是说它这设计不好,但是就感觉太烦了。 4. 分页实现 分页一般用于列表数据多页显示,或取总数中的几条数据使用。mysql中的分页,使用limit,这也是大多数数据库的选择,样例如下: select username from tb1 limit 50, 100; 而在oracle中则不太一样,它使用行号去定位记录,一般需要使用嵌套子查询;样例如下: select * from (select t.*,rownum num from tb1 t where rownum<=100 ) where num>50 性能比limit怎么样我不清楚,反正是写得挺烦的。 5. 查询执行计划 查询执行计划,可以看出哪些语句是需要优化的,这个工作实际上还是比较专业的。但如果想简单看看情况,mysql中可以这样做: explain select * from tb1 where username='xx' order by id limit 10; 而oracle中要查看执行计划,则需要借助工具或者自己写,样例如下: -- 1. 执行查询执行计划语句 explain plan for select * from tb1 where username='xx'; -- 2. 查看执行计划结果 select * from table(dbms_xplan.display()); oracle还有其他许多种查看执行计划的方式,就不列举了。也没啥好坏之分,能查看就行。 6. 客户端可视化工具 这个简单说说,mysql有很多工具,sqlyog,navicat,mysqlworkbench。。。 oracle也有很多,plsql,navicat。。。 而具体操作上的差异则根据客户端工具的差异来,无可厚非。 7. 对超长文本的处理 mysql中对超长文本使用text和longtext类型进行处理,和其他字段并没有太多差别(不能建有效索引除外) 而oracle中则使用CLOB类型进行存储超长字符,但它有许多限制,普通查询无法显示clob,分号限制等等。但它可以容纳上G的数据。 可能更多需要考虑存储结构异样等问题吧! 8. 日期字段查询 都支持date,timestamp等日期数据类型。 mysql支持直接使用字符串日期进行条件过滤,默认格式为:yyyy-MM-dd HH:ii:ss 比如: select * from tb1 where dt>'2020-09-13 12:15:01'; 而oracle则要求严格些,要求必须都是日期老式string格式才能比较; select * from tb1 where dt>to_date('2020-09-13 12:15:01', 'yyyy-MM-dd hi24:mi:ss'); 虽然加这么个格式东西也不复杂,但总感觉不爽。毕竟,90%以上情况,我只要这种格式能查就行,多让写这么多字符串,简直是罪过啊。。。 9. 修改字段类型 有时候表字段用着用着就跑偏了,需要换一种存储类型,所以改数据类型。mysql中修改字段类型,直接改就好,但有可能失败。 alter table tb1 change column f1_old f1_new int(11) comment 'xxx'; 而oracle中则分情况处理,空字段直接改,不允许修改有值字段类型,如果硬要改那就相当麻烦,如下: -- 空字段类型修改,可任意修改 alter table tb1 modify (f1_old number); -- 非空字段类型修改,分类型匹配与不匹配情况 -- 如果类型匹配,可直接改,如nchar(20) -> nvarchar(20) -- 否则不允许修改,只能主动新建字段替换回来,关键是不一定能成功 alter table tb1 rename column name to name_tmp; /*增加一个和原字段名同名的字段name*/ alter table tb1 add name varchar2(40); /*将原字段name_tmp数据更新到增加的字段name,可算可能失败*/ update tb1 set name=trim(name_tmp); /*更新完,删除原字段name_tmp*/ alter table tb1 drop column name_tmp; 很显然,oracle的做法更严谨,不允许更改字段名称,改类型必须保证正确;哎,但总感觉不爽; 10. group by 聚合 group by可以按照某字段去重一些数据,并按需要聚合数据,mysql与oracle都差不多,差别点在于oracle不允许返回group by外的其他字段(或者说不能准确描述的字段),而mysql则会随机返回一个group by的字段值。mysql如下: select username, avg(score), grade from tb1 group by grade; oracle中则要求必须确定某值: select max(username), avg(score), grade from tb1 group by grade; 看起来oracle是更严谨一些的。 11. 分区表创建 分区表的目的,在于提高查询速度和方便隔离管理。 mysql 创建分区表,Mysql不能自动创建分区,且要求分区字段必须是主键的一部分,如果想自动创建分区,需要使用mysql event事件的方式自动创建分区. 样例如下: create table tb1 ( id int(11), day datetime not null prmary key (id, day) ) PARTITION BY RANGE (TO_SECONDS(day)) (PARTITION p20200912 VALUES LESS THAN (TO_SECONDS('20200912')) ENGINE = InnoDB, PARTITION p20200913 VALUES LESS THAN (TO_SECONDS('20200913')) ENGINE = InnoDB); oracle 中创建分区表 create table tb1 ( id NUMBER(20) not null, create_time DATE ) PARTITION BY RANGE (CREATE_TIME) INTERVAL (NUMTODSINTERVAL(1, 'day')) (partition part_t01 values less than(to_date('2020-09-12', 'yyyy-mm-dd'))); 明显 oracle 支持得更好些呢。 12. with as 用法 在做一些大型数据数据分析sql时,with as sql 非常有用,在mysql低版本中是不支持的,只能自己写临时表进行处理。 而oracle则支持该通用语法: with a as ( select * from tb1 where dt = '20200912' ), b as ( select * from tb2 where dt = '20200912' ) select a.id aid, b.id bid from a join b on a.pid = b.id; 13. 事务支持 在rdb中,通常事务是指对一批操作的原子性,一致性,隔离性,持久性的体现(ACID)。大体上mysql与oracle表现是一致的。 mysql是分存储引擎,如innodb,myisam,每个引擎的事务支持能力不同,原则不同,锁实现不同,如innodb锁行,而myisam 锁表等。 oracle 中在建表时就可以指定事务槽数 -- 建表时指定事务槽数 create table t3 (id int, num int ) INITRANS 6; -- 创建索引时指定事务槽数 create unique index tb1_username_idx on tb1 (username) initrans 6; 14. 进程信息查询 查询正在运行的任务情况,可用于查询慢查询的利器。 mysql 中 直接使用 show full processlist 即可;但带条件的查询需要查表: show full processlist; select * from information_schema.`PROCESSLIST` where duration > 5; oracle 进程信息: SELECT b.sid oracleID, b.username Oracle用户, b.serial#, spid 操作系统ID, paddr, sql_text 正在执行的SQL, b.machine 计算机名 FROM v$process a, v$session b, v$sqlarea c WHERE a.addr = b.paddr AND b.sql_hash_value = c.hash_value; 反正我是记不住这么长的sql的。 15. 数据同步 mysql 中使用 binlog 可以方便的将数据同步到其他地方; oracle, 好像很复杂的样子, 待研究。 16. 其他 实际上还有其他许多差别,比如查看表结构:mysql中只需show create table tb1,面oracle中则是select dbms_metadata.get_ddl(table, 'tb1') from dual; Oracle 某些场合大小写敏感,单双引号含义不一致等等。 张三总是不等于李四的,我们允许不一样的声音,哈哈 。。。 最后,给几个出乎意料的oracle 空判定样例,供君娱乐: -- 以下都不会返回true select 1 null_judge from dual where '' is not null and '' != '' select 1 null_judge from dual where 'abc' is not null and 'abc' != '' select 1 null_judge from dual where '' is not null -- 以下都会返回true select 1 null_judge from dual where '' is null select 1 null_judge from dual where null is null
 -
 Oracle 安装与使用(一) 1。打开网盘下载以下资料:按照【Oracle 经典教程】进行安装 Oarcel 文档 2. 安装完成后打开配置工具进行配置。 配置连接出错, Oracle错误:ORA-12541 TNS无监听程序 - MySQL 要注意的时: 服务已经启动了 (检查服务启动方法) lsnrctl status 参考地址 https://blog.csdn.net/JfpBlockchain/article/details/133619697 最终发现是,地址配置错误的问题 配置成localhost 本地 D:\app\Administrator\product\11.2.0\dbhome_2\NETWORK\ADMIN ORA-12541: TNSno listener 连接报错 修改为配置localhost 则 navicat 12 正常连接 来源:https://www.alipan.com/s/mYZFSgzfqV6 | 大小:MB | 提取密码: | 解压密码:www.rainfly.cn 已经过安全软件检测无毒,请您放心下载。 若链接失效可联系管理员!
 -

-
 阿里巴巴Java 开发手册嵩山版,每个程序员都应该熟读百遍(附下载链接) 阿里巴巴Java开发手册是由阿里巴巴集团编写的一份规范文档,旨在提供一套统一的编码规范和最佳实践,以帮助Java开发人员提高代码质量和开发效率。 阿里巴巴Java开发手册嵩山版包含了丰富的内容,涵盖了Java语言的各个方面,例如命名规范、代码格式、注释规范、异常处理、并发编程、数据库访问等。每一条规范都是由阿里巴巴团队经过实践总结得出的,具有较高的权威性和参考价值。 为什么说每个程序员都应该熟读百遍呢? 首先,阅读阿里巴巴Java开发手册可以帮助我们更好地理解Java编码规范和最佳实践,提高我们自己的编码能力。通过遵循规范,我们可以编写出更加规范、清晰、易读的代码,减少因代码质量不佳而引发的问题和bug。 其次,阿里巴巴Java开发手册嵩山版是由阿里巴巴集团编写的,代表着业界的标准和经验。阿里巴巴作为中国最大的互联网公司之一,具有丰富的技术积累和实践经验。阅读阿里巴巴Java开发手册可以借鉴他们在项目开发中遇到的问题和解决方案,提升我们的开发水平和问题解决能力。 阿里巴巴Java开发手册嵩山版是一本不断更新的文档。随着Java技术的发展和变化,编码规范和最佳实践也在不断演进。每隔一段时间,阿里巴巴都会发布新的版本,更新其中的内容。因此,多次阅读可以使我们及时了解到最新的编码规范和最佳实践,保持自己的知识与时俱进。 综上所述,阿里巴巴Java开发手册嵩山版对于每个Java程序员来说,是一本必读的参考书。通过反复阅读和实践,我们可以提高自己的编码能力和开发水平,写出更加高质量的代码。 来源:阿里云盘 | 大小:MB | 提取密码: | 解压密码:www.rainfly.cn 已经过安全软件检测无毒,请您放心下载。 若链接失效可联系管理员!
 -

-
 升级IDEA后Lombok失效 搜索一番,是由于IDEA版本导致的Lombok失效,不过这个问题后来解决了。 所以,我们只需要更新lombok版本,使用1.18.14及之后的版本即可: <dependency> <groupId>org.projectlombok</groupId> <artifactId>lombok</artifactId> <version>1.18.14</version> <scope>provided</scope> </dependency> IDEA 插件 正常安装,需要升级 Lombok 版本 参考 链接: https://blog.csdn.net/chinaherolts2008/article/details/118711313


